By Jenn Rein // Photography by Paulette Phlipot
—
Choosing a seasonal confection that best suits your palate and dietary needs, as well as those of your holiday guests, can be overwhelming. When focusing solely on pie, it becomes a question of varieties in filling … and then there’s the crust. The innumerable ways to lay the foundation for pie might include alternatives like graham crackers, nuts, oats, cookie crumbs, phyllo dough, and even saltines. Still, if you choose a traditional route, you must ask yourself a separate set of questions. For instance—to lard or not to lard?
After gathering input from a handful of trusted local chefs, I’m unveiling my lesson in pie versatility. Three dessert crafters outlined the tips and tricks that took me on a journey of delicious discovery. After implementing their advice, those who indulge in your sweet triumph will be singing your praises for many holidays to come.
Brain Healthy
I’m never one to decry the use of butter. As a matter of fact, I encourage overuse. And that is where a pie-making medical professional could really help me out. If you are an M.D., a brain-health advocate, and new cookbook author, like Jackson’s Annie Fenn, your pie mission may include conjuring up healthy substitutions for the richest of ingredients, like she does in her Apple Tahini Tart recipe below.
“This is such a fun recipe because the pie pushes all the feel-good apple pie nostalgic buttons, while also being hearty and filling,” says Fenn. “Because there’s very little sugar, the flavors of the apple and cinnamon really shine. Plus, it is packed with fiber from the apples, dates, oats, and nuts, so one slice really satisfies.”
Her tips for success are very specific:
• “The crust is super easy to make, but don't skip the step about pressing it firmly into the pan. I like to use the flat bottom of a jelly glass.”
• “If you don't have time to soak the cashews for the cream, boil them in a pot of water for 15 minutes, instead.”
• “A powerful blender works best for prep, but if you don't have one, just blend for a few extra minutes until you have the consistency of whipped cream.”
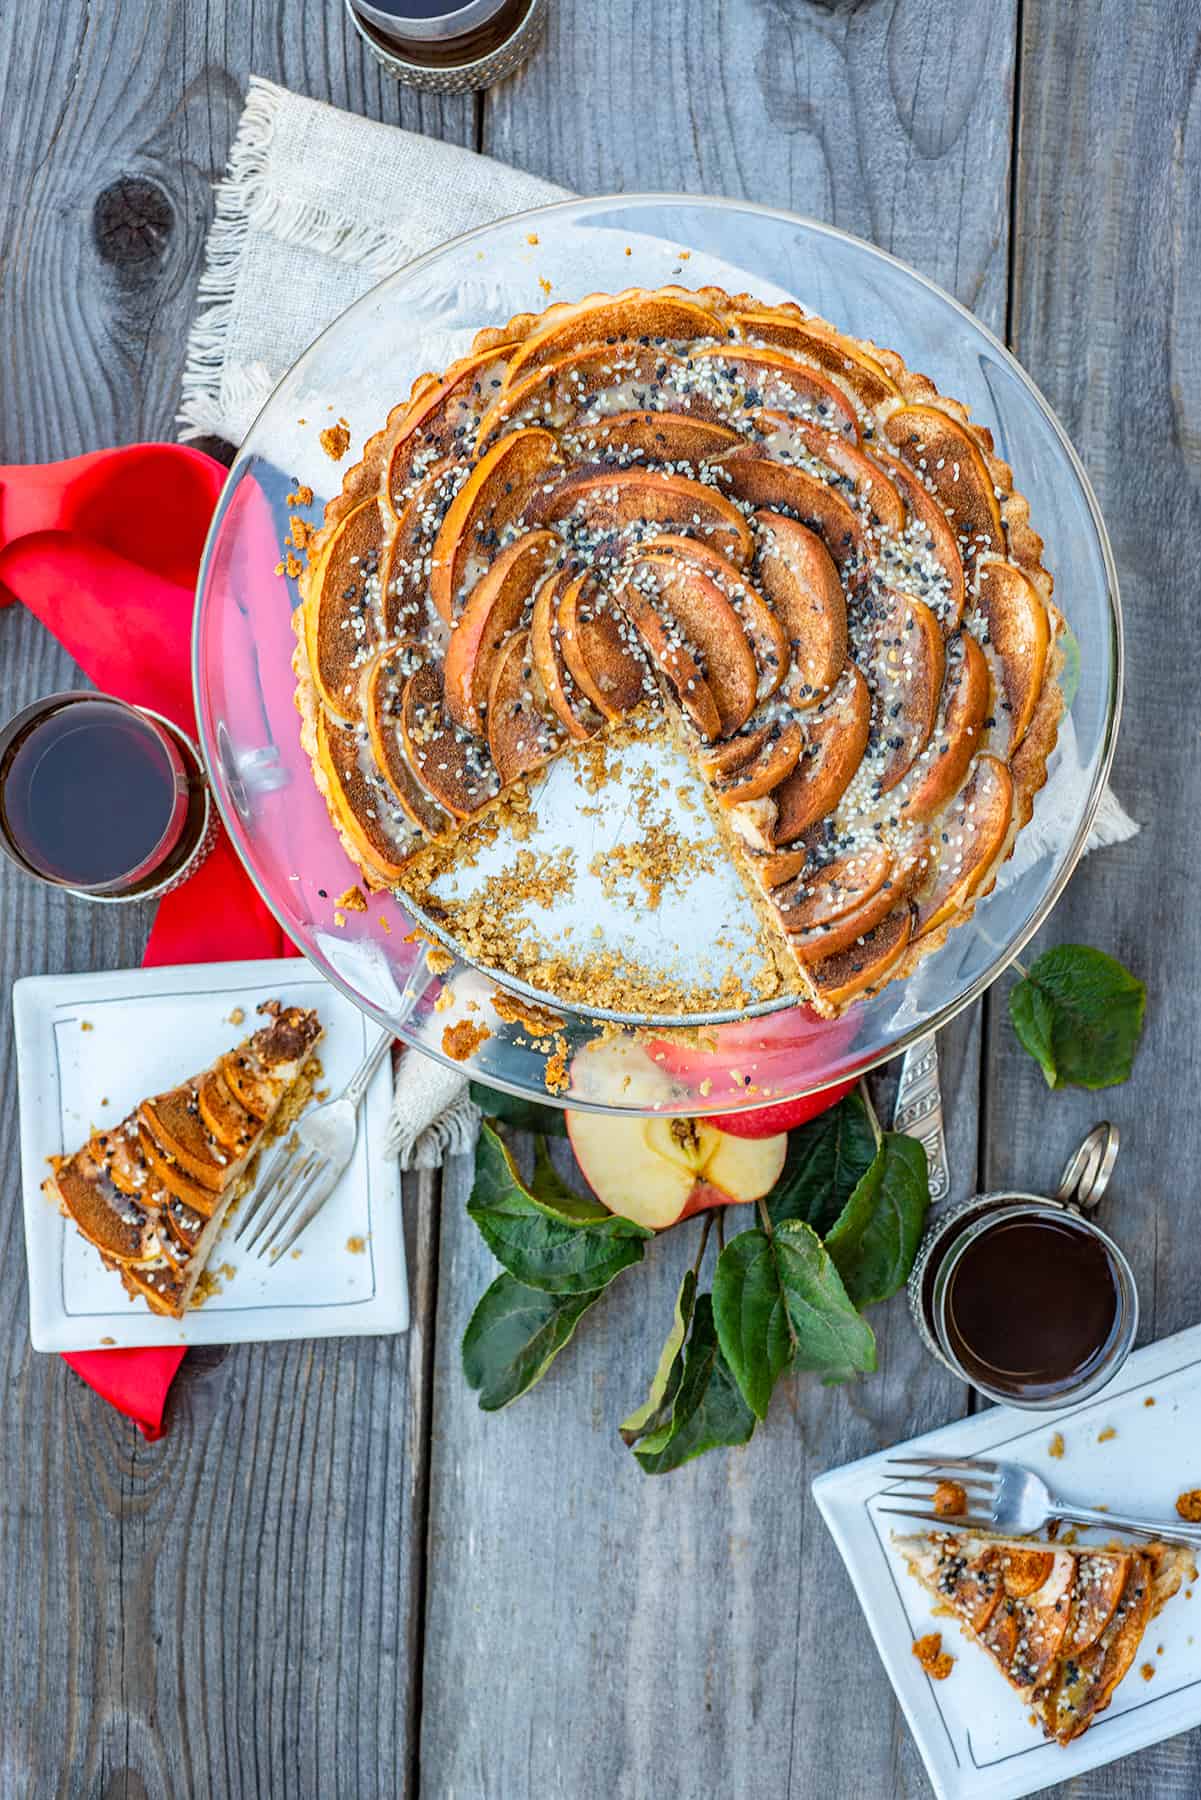
Apple Tahini Tart with Maple Oat Crust
Makes one 9-inch tart
—
When Fenn, was seeking a healthy replacement for frangipane–a butter-laden pastry cream that includes creamed sugar and almond paste–she discovered that cashew cream, combined with tahini, yields the same rich flavor and texture.
—
For the crust:
1 ½ cups old-fashioned rolled oats
½ cup almond flour
¼ cup extra virgin olive oil
¼ cup pure maple syrup
¼ teaspoon kosher salt
1 large Medjool date, pitted
- Preheat your oven to 350°F.
- Place all ingredients in the bowl of a food processor and pulse until evenly combined.
- Pour the dough onto a 9-inch tart pan with a removable bottom. Cover the dough with wax or parchment paper and, using your hands, press to form an even layer on the bottom and sides of the pan. Next, use the flat bottom of a glass cup to press the crust flat. Prick all over with a fork, and place on a rimmed baking sheet.
- Bake the crust for 15 minutes, or until it is set in the middle and light brown. Set aside to cool.
For the cashew cream:
1 ½ cups raw, unsalted cashews, soaked in water for at least 2 hours
2 tablespoons maple syrup
1 tablespoon tahini
½ teaspoon kosher salt
1 ¼ cups cold water
- Drain the soaked cashews and place them in a blender with the maple syrup, tahini, and salt.
- Add half the water and turn the blender on medium to combine. Then, turn it up to high and blend to a whipped cream consistency. (Add water by the spoonful until the consistency is just right.)
- Measure 2 cups for the tart and store any extra in the refrigerator for up to 5 days.
For the apples:
2 large apples (Gala or Pink Lady), halved, cored, and cut into ¼-inch slices
¾ teaspoon cinnamon
¾ teaspoon coconut palm sugar
- Pour the cashew cream onto the center of the tart shell and smooth it over the surface using a spatula or a spoon.
- Arrange the apple slices in a circle, starting at the outside of the tart and working to the center. Press the slices gently into the cream.
- Stir the cinnamon and coconut palm sugar together in a small bowl and sprinkle evenly on the surface of the apples.
- Return the tart to the oven and bake for 35 to 40 minutes, until the edges of the apples are browned and the crust is golden brown.
- Let the tart cool for about 30 minutes.
For the drizzle and topping:
1 tablespoon tahini
1 tablespoon maple syrup
1 tablespoon water
1 teaspoon white sesame seeds (optional)
½ teaspoon black sesame seeds (optional)
- In a small bowl, stir together the tahini, maple syrup, and just enough water to form a pourable glaze (starting with one teaspoon of water, adding more, if needed).
- Drizzle in a concentric circle over the surface of the cooled tart, then sprinkle the sesame seeds overtop, if using.
- Carefully lift the bottom of the tart pan away from its side. Cut and serve.
Big Batch Traditional
Amy Oldis has been making pie for Café Genevieve for over eight years. (She also makes desserts for Orsetto Italian Bar in Jackson.) With a culinary resume that includes the Snake River Grill and Shooting Star, she has had ample opportunities to understand the chemistry of crafting a traditional pie crust.
Oldis makes crust in large volume, and the recipe she offers here yields four pie crusts, when doubled. Making multiple crusts lends the opportunity to create lattice work, and to also increase your chances of being declared a “holiday pie hero.”
I was delighted to find that she lives in the “all butter” crust camp, but also that her crust tips will aid in both flavor and execution. For example, adding a little bit of vinegar helps to make the bite more tender.
With an inherent tendency to modify for flavor, Oldis describes her approach to a “traditional” apple pie: “I like to make an apple pie with cheese, and substitute in bacon fat for a little bit of the butter. It tastes amazing.”
I believe her.
She also wants your butter tactics to succeed. “If you put a prepped butter crust in the fridge too long, it will become hard,” she says. “What I like to do is roll it out into a disc, and then freeze it. It will only take about 30 minutes to thaw.”
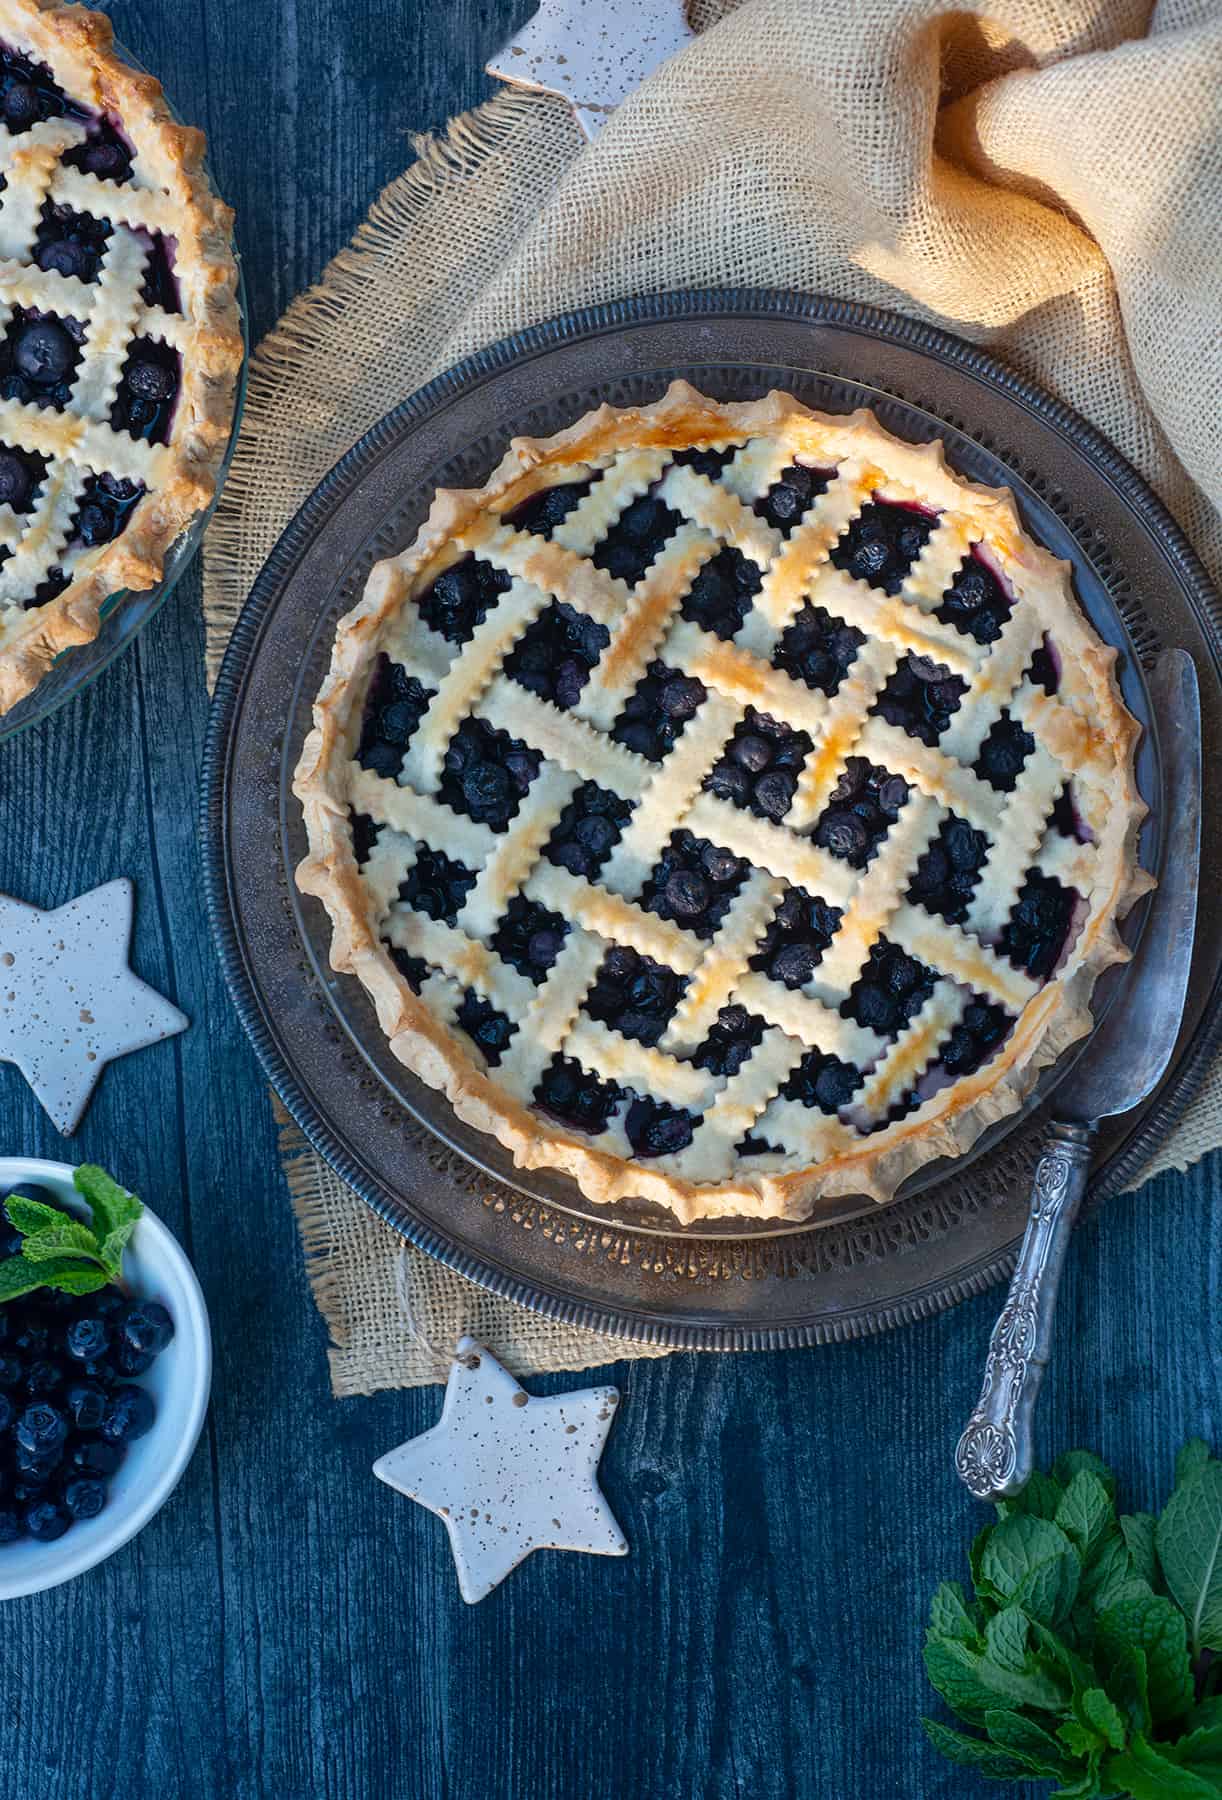
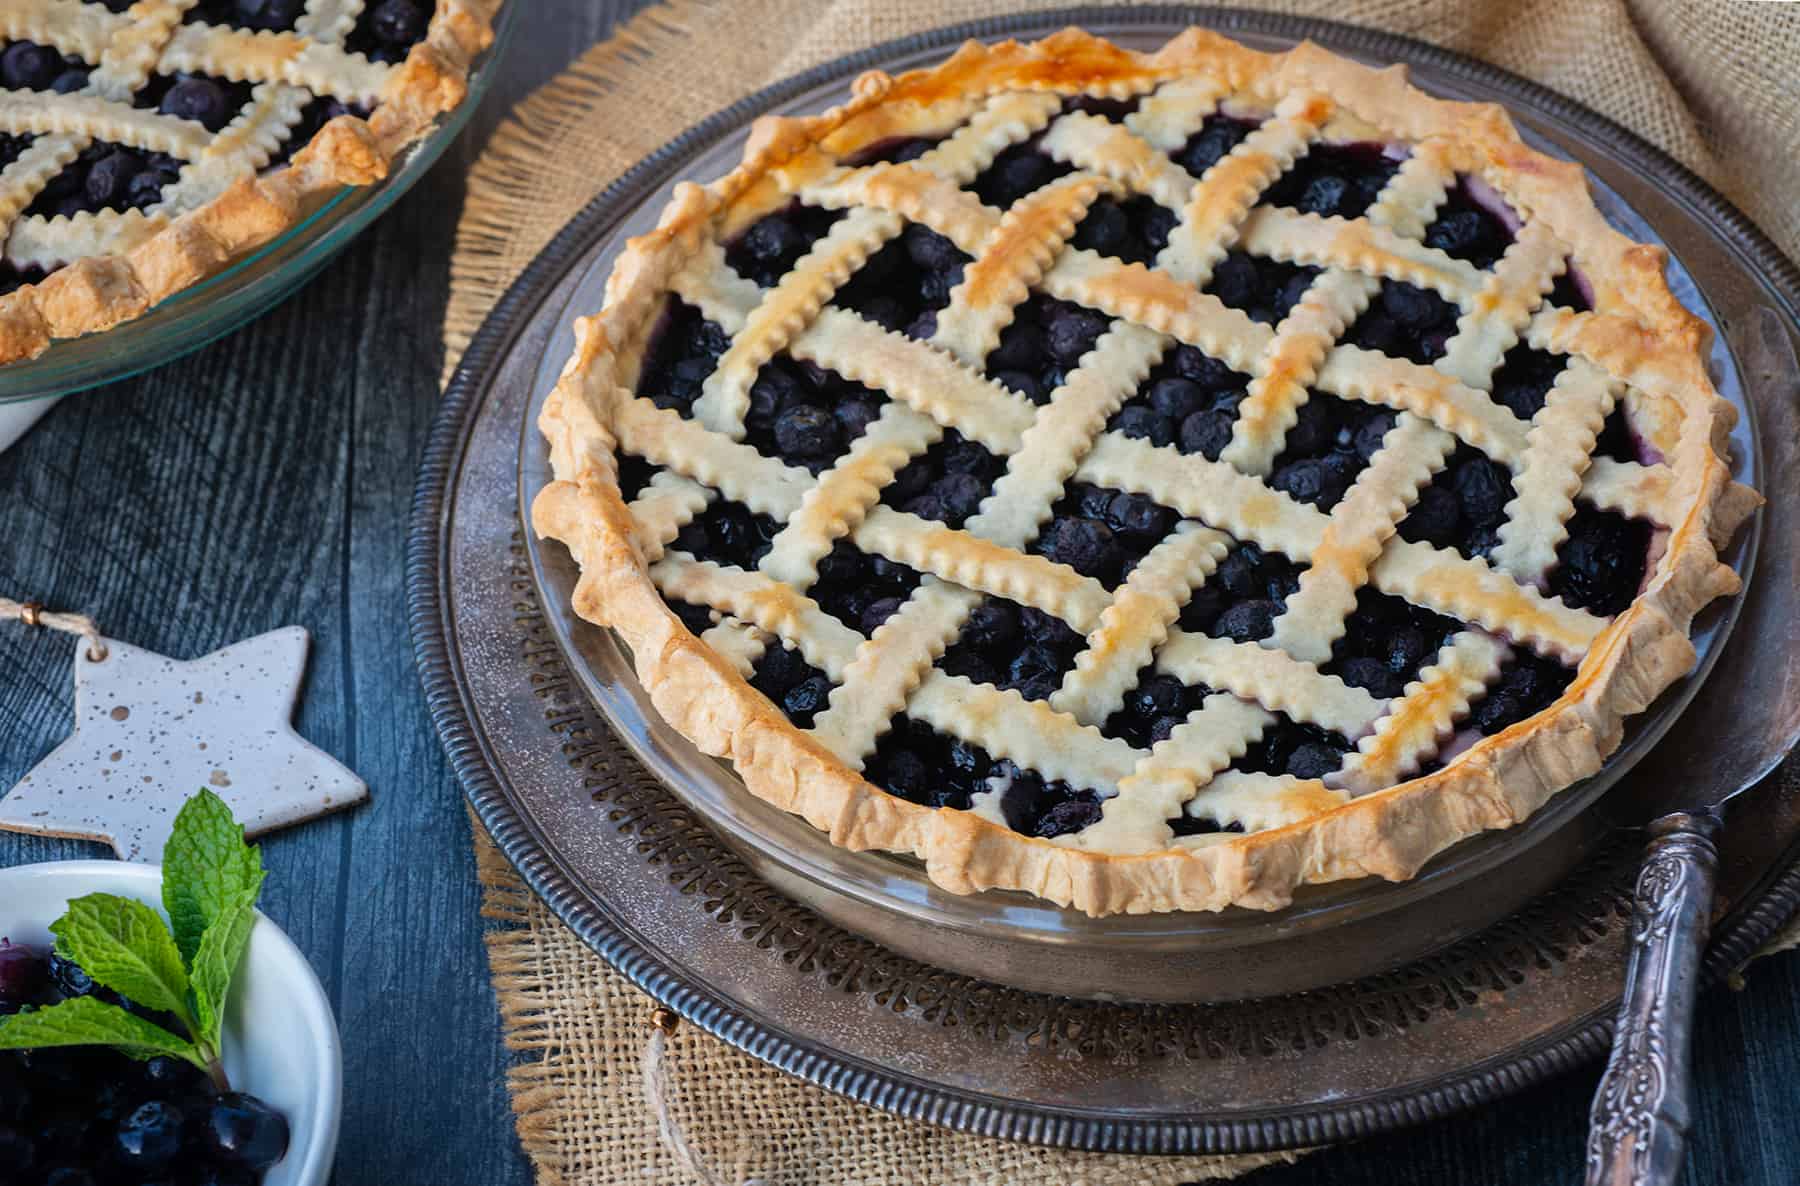
Berry Pie with an All-Butter Crust
Makes 2 pies with a top and bottom crust for each
—
Amy Oldis loves a traditional butter crust. Here, she offers a berry version, just in time for the holidays. The traditional crust freezes well
if you follow Amy’s tip to roll the dough into circles prior to freezing.
—
For the crust:
5 ½ cups all-purpose flour
2 teaspoons kosher salt
2 teaspoons sugar
1 pound butter, cold and cubed
1 cup cold water
3 teaspoons vinegar
- Combine all dry ingredients into a large mixing bowl or a blender or food processor with a dough blade.
- Cut butter into the dry ingredients and incorporate to a fine crumb size.
- Combine the water and vinegar in a separate bowl; add it sparingly to the dry mixture.
- Portion dough into 4 balls and knead them lightly into discs.
- Refrigerate the discs until cold, but still malleable.
- Roll chilled discs into pie-tin shaped circles, then freeze until needed.
For the berry filling:
¾ cup sugar
¼ cup cornstarch
½ lemon, zested
½ lemon, juiced
3 pounds blackberries or blueberries
¼ teaspoon salt
4 pie crusts
2 egg whites, beaten
- Preheat oven to 375° F.
- Combine all the dry ingredients in a large mixing bowl.
- Add berries, lemon zest, and lemon juice. Stir to combine.
- Halve the filling, placing each half into a crust-lined pie shell.
- Use egg whites to wash the edges of the bottom crust.
- Affix a solid pie crust to the top, crimping well and slicing a vent in the center. Or, cut top crust into strips to create a lattice design. Wash with egg whites.
- Bake for one hour, or until the crust is golden brown and the middle is bubbling. (Cover edges—or the whole pie—with foil later in the baking process, if it browns too fast.)
Paleo Friendly
Lisa Hanley, of Teton Valley’s Forage Bistro & Lounge, has access to a pie guru in the form of her mother-in-law, Dawn Hanley-West. Ironically, however, Lisa’s husband Christian doesn’t eat flour or refined sugar, so she just rolls with it.
Hanley’s gluten-free Chocolate Cream Pie should be easily recognized by Forage fans, as the restaurant offers it regularly on the menu. Her tip for ensuring this dessert presents properly? Gelatin.
“Sometimes, depending on the size of the eggs and the consistency of the heavy cream, [the filling] won’t set properly. I started adding gelatin—just a little bit—and that helps firm it up,” explains Hanley. “The fridge time is important, too. You really need to give it a good 24 hours to set.”
Her input on crust success: “When you’re making the crust, be sure you grind up the nuts first, and then add the dates slowly. When you add the maple syrup and vanilla, do the same. If you do it too fast, you’ll get wetness. You don’t want that; you want a dry crumble.”
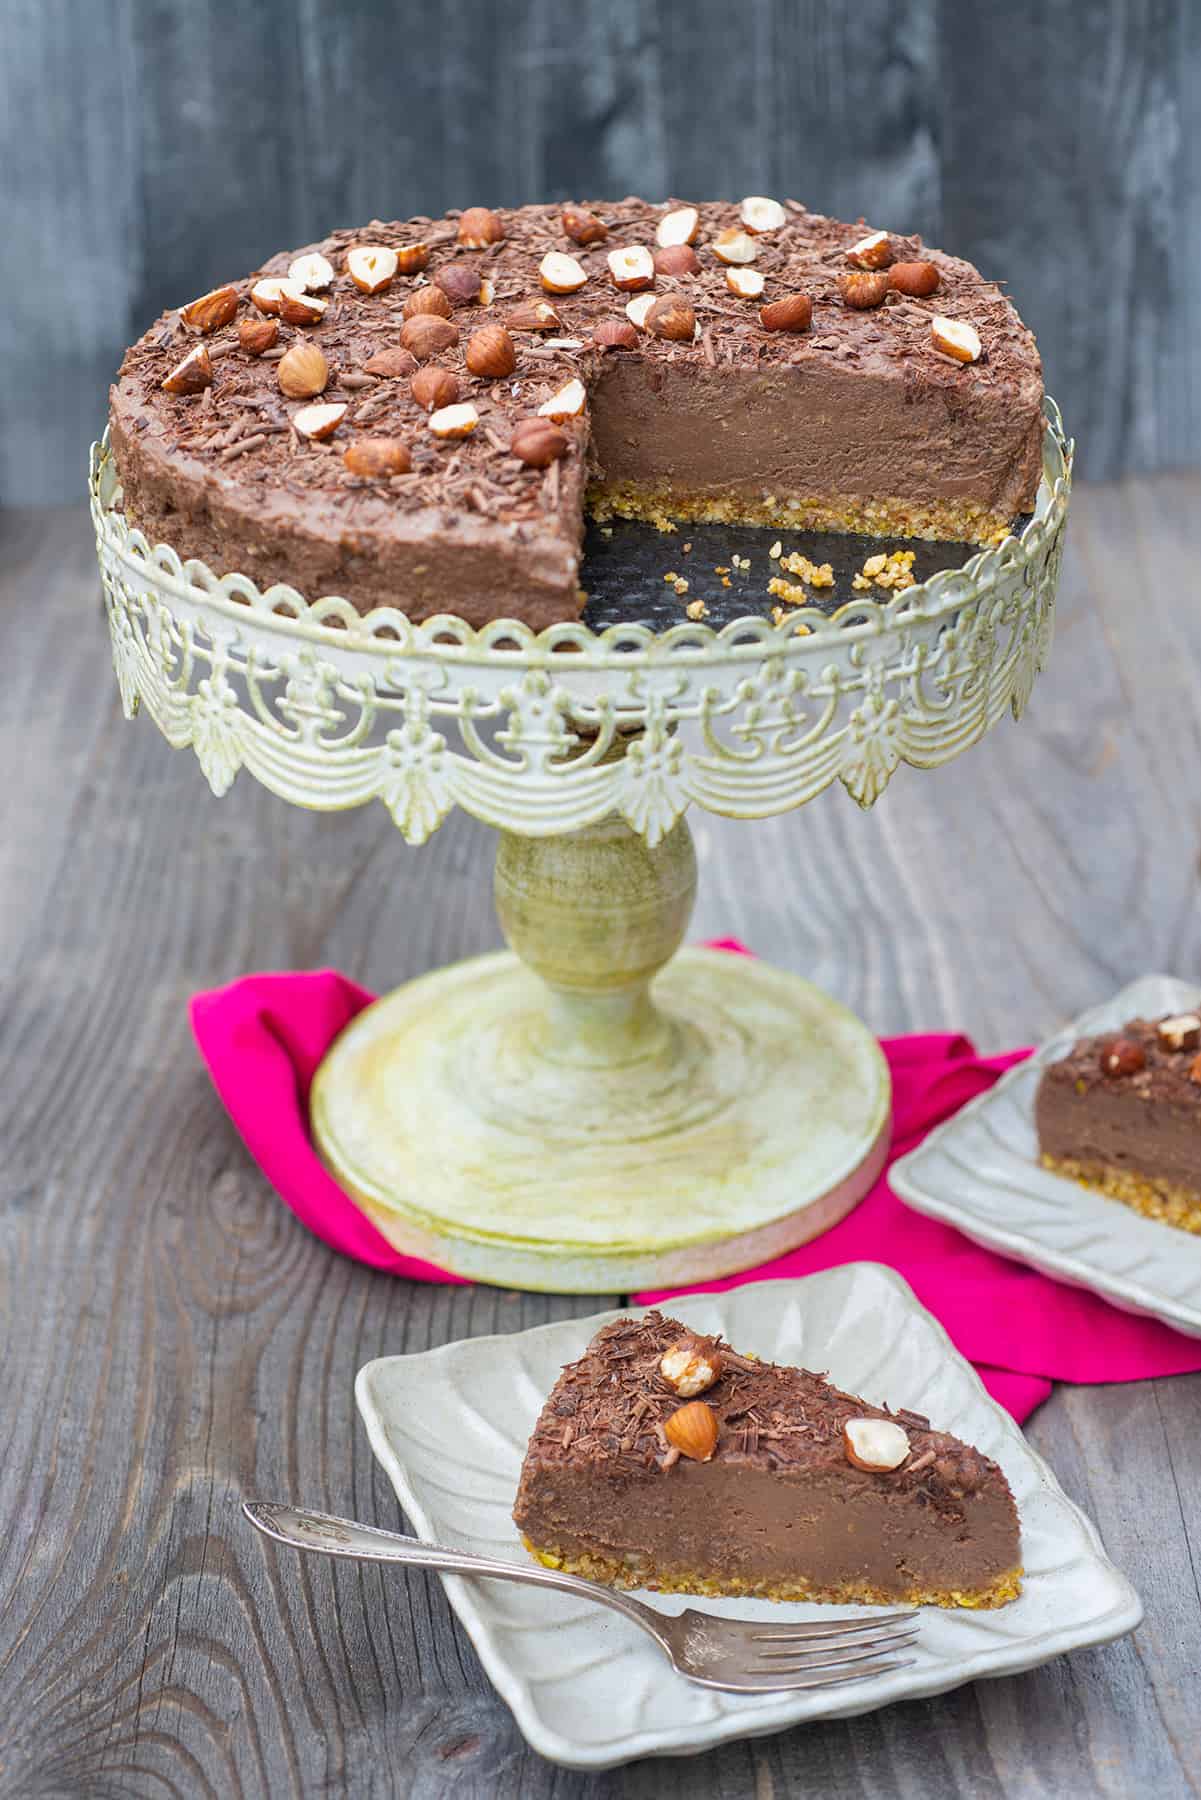
Chocolate Cream Pie
Makes one 9-inch pie
—
Lisa Hanley’s chocolate cream pie sees frequent rotation on the menu at Forage Bistro & Lounge. The chocolate custard filling is a smooth delivery that rests atop a satisfying gluten-free date-nut crust.
—
For the crust:
2 ½ cups mixed nuts (cashew, hazelnut, pistachio)
½ cup pitted dates, soaked
1 teaspoon maple syrup
½ teaspoon vanilla extract
Salt
- Using cooking spray, generously grease a 9-inch springform pan.
- In a food processor, grind equal parts mixed nuts. Add the dates slowly. Then, add the maple syrup, vanilla, and a pinch of salt. Process until blended. (The crumb should stick together. If it doesn’t, add another date or two.)
- Once blended, press crumb mixture into the bottom of the springform pan.
- Chill the crust while preparing the custard.
For the custard:
12 egg yolks, whisked
1 quart heavy cream
1 cup dark chocolate chips
½ cup sugar
1 tablespoon vanilla extract
1 tablespoon hazelnut extract
1 teaspoon espresso powder
1 teaspoon salt
1 teaspoon gelatin
Chocolate shavings, crushed hazelnuts, whipped cream (to top)
* Add 1 cup creamy peanut butter for a chocolate-peanut butter version.
- Add heavy cream and sugar to a large saucepan over medium-high heat; whisk together.
- When the mixture is hot, add chocolate chips, vanilla, hazelnut, espresso powder, salt, and gelatin. Continue to whisk all ingredients to combine.
- Little by little, add 1/8 of the mixture into the bowl with the whisked egg yolks, while whisking (to temper eggs).
- Pour tempered egg yolk mixture back into the saucepan. Whisk until simmering (about 90 seconds). The consistency should be like a thin pudding. (Do not overcook!)
- Remove from heat and let sit for 5 minutes; then whisk one last time and pour into the cooled crust pan.
- Place in the refrigerator and chill for 24 hours.
- Top with chocolate shavings, crushed hazelnuts, and serve with whipped cream.