By Mel Paradis // Photography by Paulette Phlipot
—
Those who take their coffee seriously know that cold brew is currently hot—especially when the outside temperatures are high. This coffee phenomenon—relatively new to America—dates back to 1600s Japan. And before its recent surge in popularity stateside, you had to seek it out. Now, cold brew coffee is found on Dunkin’ Donuts’ menus and in the refrigerator case at your hippest grocery stores.
Let me break it down.
Traditional iced coffee—coffee that has been brewed hot, then chilled and served cold—used to be the go-to for a caffeinated mid-summer beverage. To make it, you simply brewed coffee and then threw it in the fridge. Or, you brewed a double-strength cup and served it over ice (shots of espresso poured over ice worked well, too).
Cold brew, on the other hand, is coffee made by slowly pouring room temperature water over grounds, and leaving it to steep for 12 to 24 hours before straining. This long brew time, along with a high grounds-to-water ratio, makes a concentrate that is used as the base for fancy beverages (recipes to follow).
But what’s all the fuss about?
Hot water in traditional brewing brings out the full-bodied flavor of a bean; however, the heat also oxidizes and degrades the oils and compounds in the coffee. The result yields the traditional bitter taste found in a cup of drip or a shot of espresso. Cold brew, on the other hand, uses time, rather than heat, to extract flavor. This brewing style produces a sweeter, smoother, and less-acidic cup of joe. (This is also true for cold brewing tea.)
The DIY ground rules:
If you’re a cold-brew addict who needs a daily fix, but find your habit sets you back a bit (a cup costs anywhere from 3 to 5 dollars), there are several ways to make it at home. Cold brew systems range in price from 15 to 200 dollars, with the cheapest systems consisting of a glass jar and a mesh filter and the more expensive ones looking like chemistry sets from a different era. But for a taste similar to that served up at your favorite coffee house—and without breaking your budget—I recommend systems that contain brewing containers, reusable filters, and serving pitchers, from companies like Toddy and Filtron. These sell for around 40 dollars.
Not sure you want to commit to the purchase of a system?
Don’t worry. You can test drive a DIY cold brew with on-hand kitchen supplies, like a quart-sized Mason jar and a filter. Cheesecloth, paint strainer bags, and nut milk bags are cheap filter options. And if you already have a French press—an all-in-one piece of equipment—you’re good to go.
Once you have your equipment, it’s time to brew. But don’t rush in before dissecting your grind. Too fine a grind makes coffee that’s cloudy and bitter.
Too course, and it will be weak and lackluster. The best grind for a long, smooth finish is somewhere between a drip and French-press grind.
Next, let’s suss out the proportion of grounds to water. A high water-to-grounds ratio extracts more coffee “solubles,” which is where the flavor resides. A good place to start is two ounces of grounds to eight ounces of water (or twice as much coffee as in a standard hot brew). Gradually pour room temperature or cold filtered water over the grounds to ensure there are no dry pockets. Set your brew aside for 12 to 24 hours. Strain, and store it in the refrigerator for up to two weeks.
This is not an exact science. Try playing with proportions, remembering cold brew is a concentrate. If it ends up too strong, just add water to your finished beverage to dilute it. You can also cap your straining at 12 hours. Then, if you desire more flavor, just let it sit longer.
Once you’ve mastered making the concentrate, add hot or cold water, milk, or cream to create the finished beverage. Or, for a quick cup of black coffee, just add hot water. You can pour it over ice and add tap water for an iced coffee. Or, for an iced mocha, add chocolate milk and serve on ice.
Don’t limit your cold brew consumption to an on-the-go fix. Cocktails and dessert anyone?
The dilly on nitro
—
While most local coffee shops make a stellar cold brew, those wanting to up the ante should try a “nitro” cold brew. Nitro is cold brew that is infused with nitrogen gas to give it an even smoother taste and creamier texture. It’s served either from a tap or in cans with a nitrogen cartridge (think Guinness, but with caffeine rather than alcohol). Nitro that comes straight from the tap is typically served without ice, but sometimes with a topper of sweet cream. Look for it on tap at Picnic in Jackson and Barrels & Bins in Driggs, and in beverage fridges at grocery stores like Lucky’s Market and Jackson Whole Grocer.
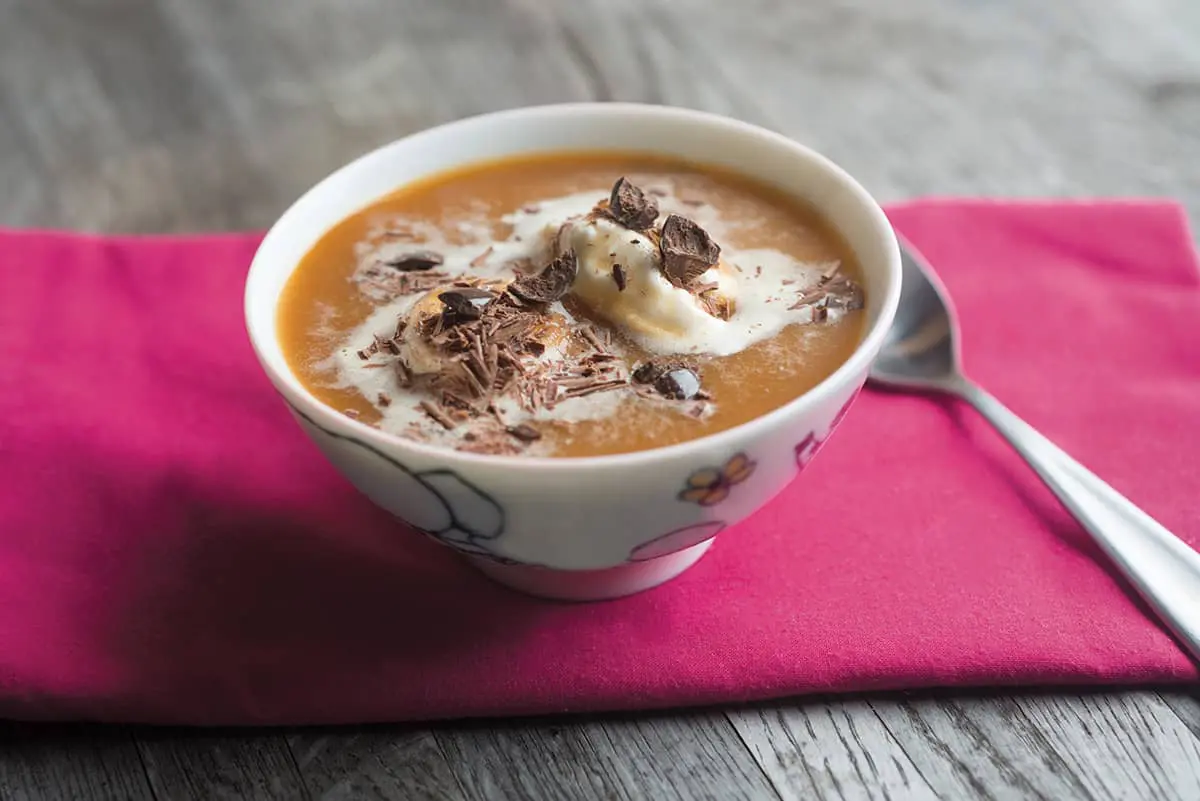
Affogato
Serves 1
—
The ultimate adult dessert, Affogato means “drowned” in Italian. The gelato—a treat once reserved for royalty—adds a decadent creaminess that outshines American ice cream.
—
2 scoops vanilla gelato or ice cream
4 ounces cold brew coffee
Shaved chocolate
Chocolate-covered espresso beans, chopped
1. Place ice cream in a bowl.
2. Pour cold brew over the ice cream and top with shaved chocolate and chopped espresso beans. Serve.
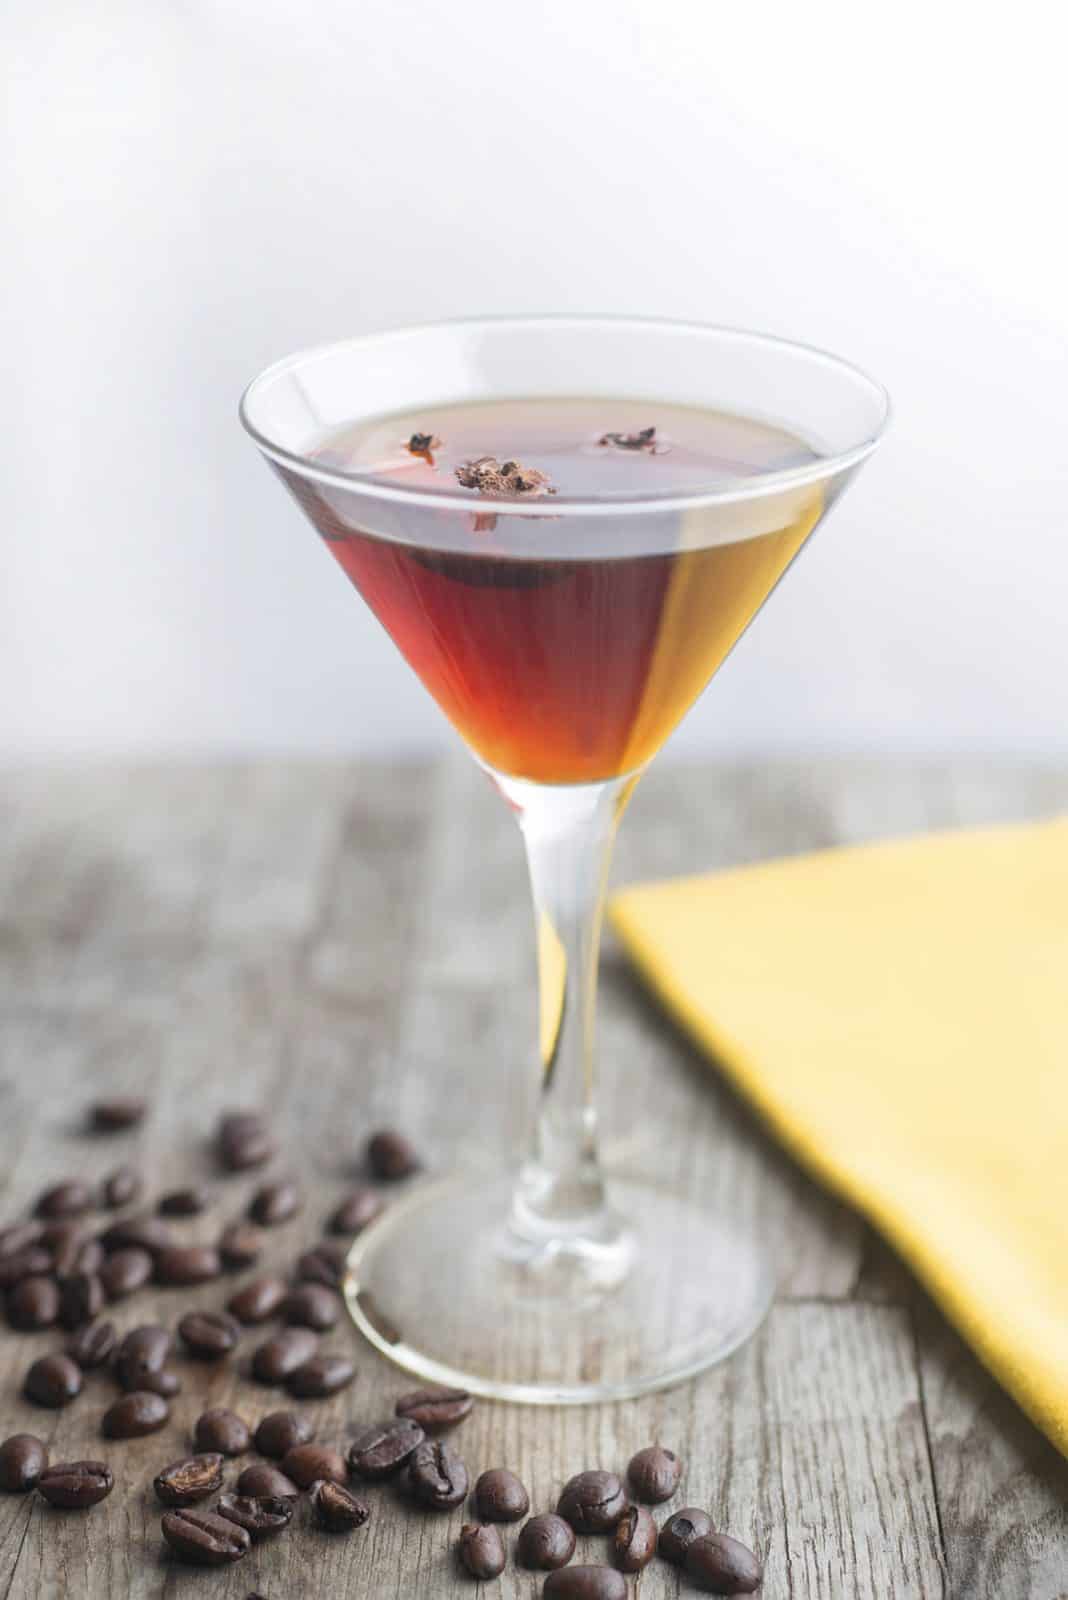
Cold Brew Martini
Serves 1
—
If you’re making cold brew specifically for this cocktail, change the ratio of grounds to water from 1:4 to 2:4. The super concentrate gives the drink an extra jolt of both caffeine and flavor.
—
2 parts vodka (use a flavored vodka like Stoli Vanil,
for a twist)
1 part chocolate liquor or coffee liqueur
(i.e. Godiva Dark Chocolate or Kahlúa)
1 part cold brew coffee
Simple syrup to taste (optional)
Chocolate-covered espresso beans, chopped
1. Pour first 4 ingredients into a cocktail shaker. Add ice.
2. Shake well, strain, and pour into a chilled martini glass.
3. Top with chocolate-covered espresso beans.