
By Sue Muncaster // Photography by Paulette Phlipot
—
To some people, camp cuisine likens visions of flavorless freeze-dried dinners or cold, canned chili. To others, like myself, camping is just another opportunity to outdo yourself by filling the bellies of family and friends with warmth, nourishment, and love after a hard day of adventuring. Mastering the timeless method of Dutch oven cooking over a fire fills a primal need to connect with our ancestors. It’s an art that makes us believe we haven’t become too soft in our civilized world to still thrive in the ‘ole Wild West.
Virtually anything you would bake at home can go in the Dutch oven: Main dishes can resemble your favorite one-pot dinner at home. Cheesy bites that come in layers, like lasagnas and enchiladas, never disappoint. With Dutch oven baked goods—like cakes, cobblers, quick bread, biscuits, and muffins—the sky is the limit. And there is no shame in shortening the learning curve by practicing with boxed mixes or canister cinnamon buns.
My all-time favorite backcountry food memory includes a gooey-caramelly pineapple upside-down cake flipped over onto a cutting board and served by a costumed river-nymph on Day 16 of a river trip through the Grand Canyon. Now, that was living!
The Heat
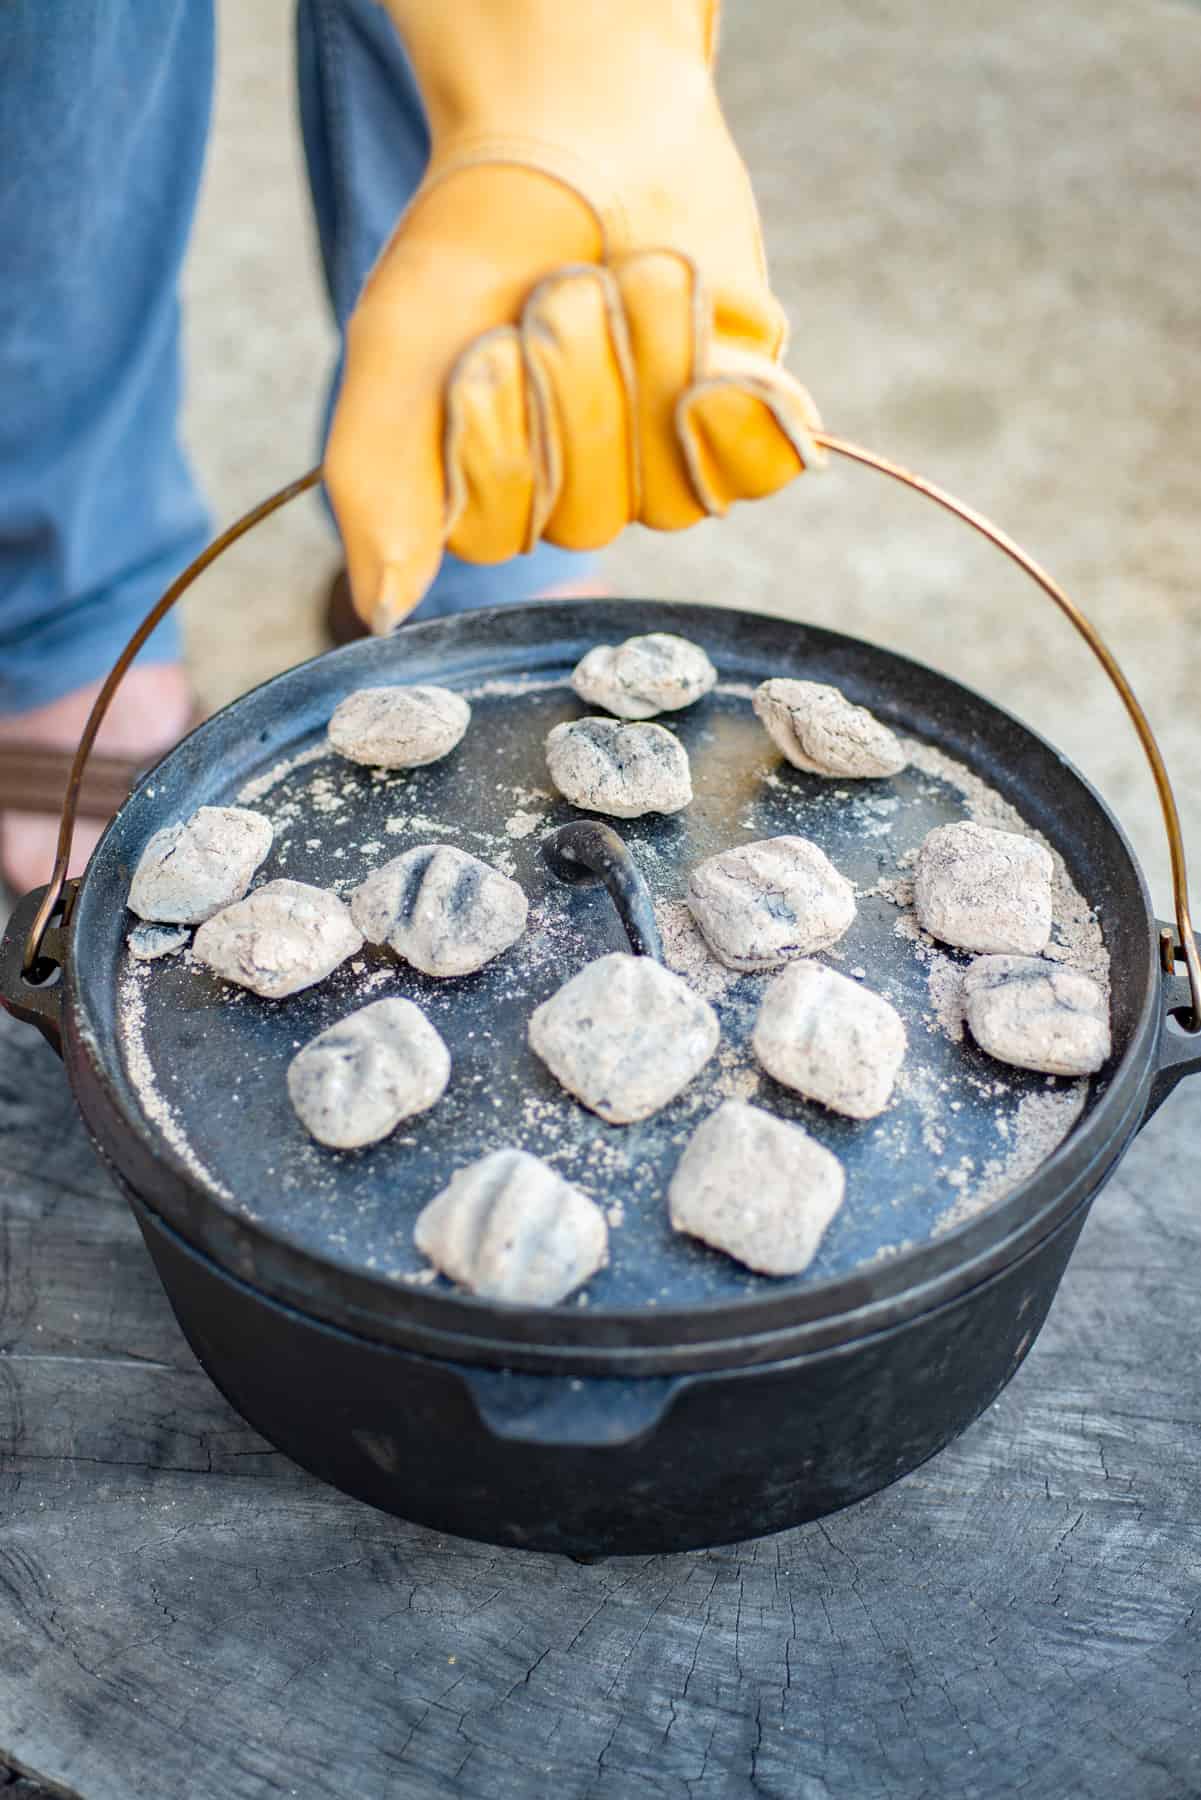
Dutch oven cooking and baking involves creating a makeshift oven by surrounding your pot with charcoal on the top and bottom. The sealed vessel needs to maintain a temperature of 350° F to 400° F inside. Cast iron is ideal for spreading and maintaining heat, so food doesn’t burn in one spot—eliminating the need for stirring.
The Equipment
- Cast iron or aluminum Dutch oven with legs, a solid handle on the lid, and a strong, easily movable carrying bail
- Large channel-lock pliers (for lifting the lid)
- Large oven mitt (leather is best)
- Pan scraper or stiff nylon scrub brush
- Charcoal and lighter fuel or “match light” coals
- Long metal tongs or a shovel for moving coals
- Chimney-style briquette igniter to help heat coals faster and more evenly (optional)
The How-To
- Get yourself a cold beverage and start the coals in a firepan. (The size of your oven and desired temperature will determine the number of coals. Add a few extras, just in case.)
- Grease the Dutch oven and prepare the recipe. Place the ingredients in the pot and seal it with the lid.
- When the coals are almost white, create space in the firepan for the Dutch oven. Use your tongs, or a shovel, to spread out the appropriate number of coals for the bottom; place the oven on top. Then, spread coals evenly over the top of the lid.
- Get yourself another cold beverage and relax.
- Use the approximate cooking time in the recipe to guide you, and then wait until you smell baked deliciousness before taking a look inside (being careful the ash doesn’t fall into the food). You’ll be tempted to look sooner, but trust me on this one.
- Be prepared to serve food piping hot. (No one wants to wait for a cake to cool and be frosted, and they will love you even more for the melted frosting).
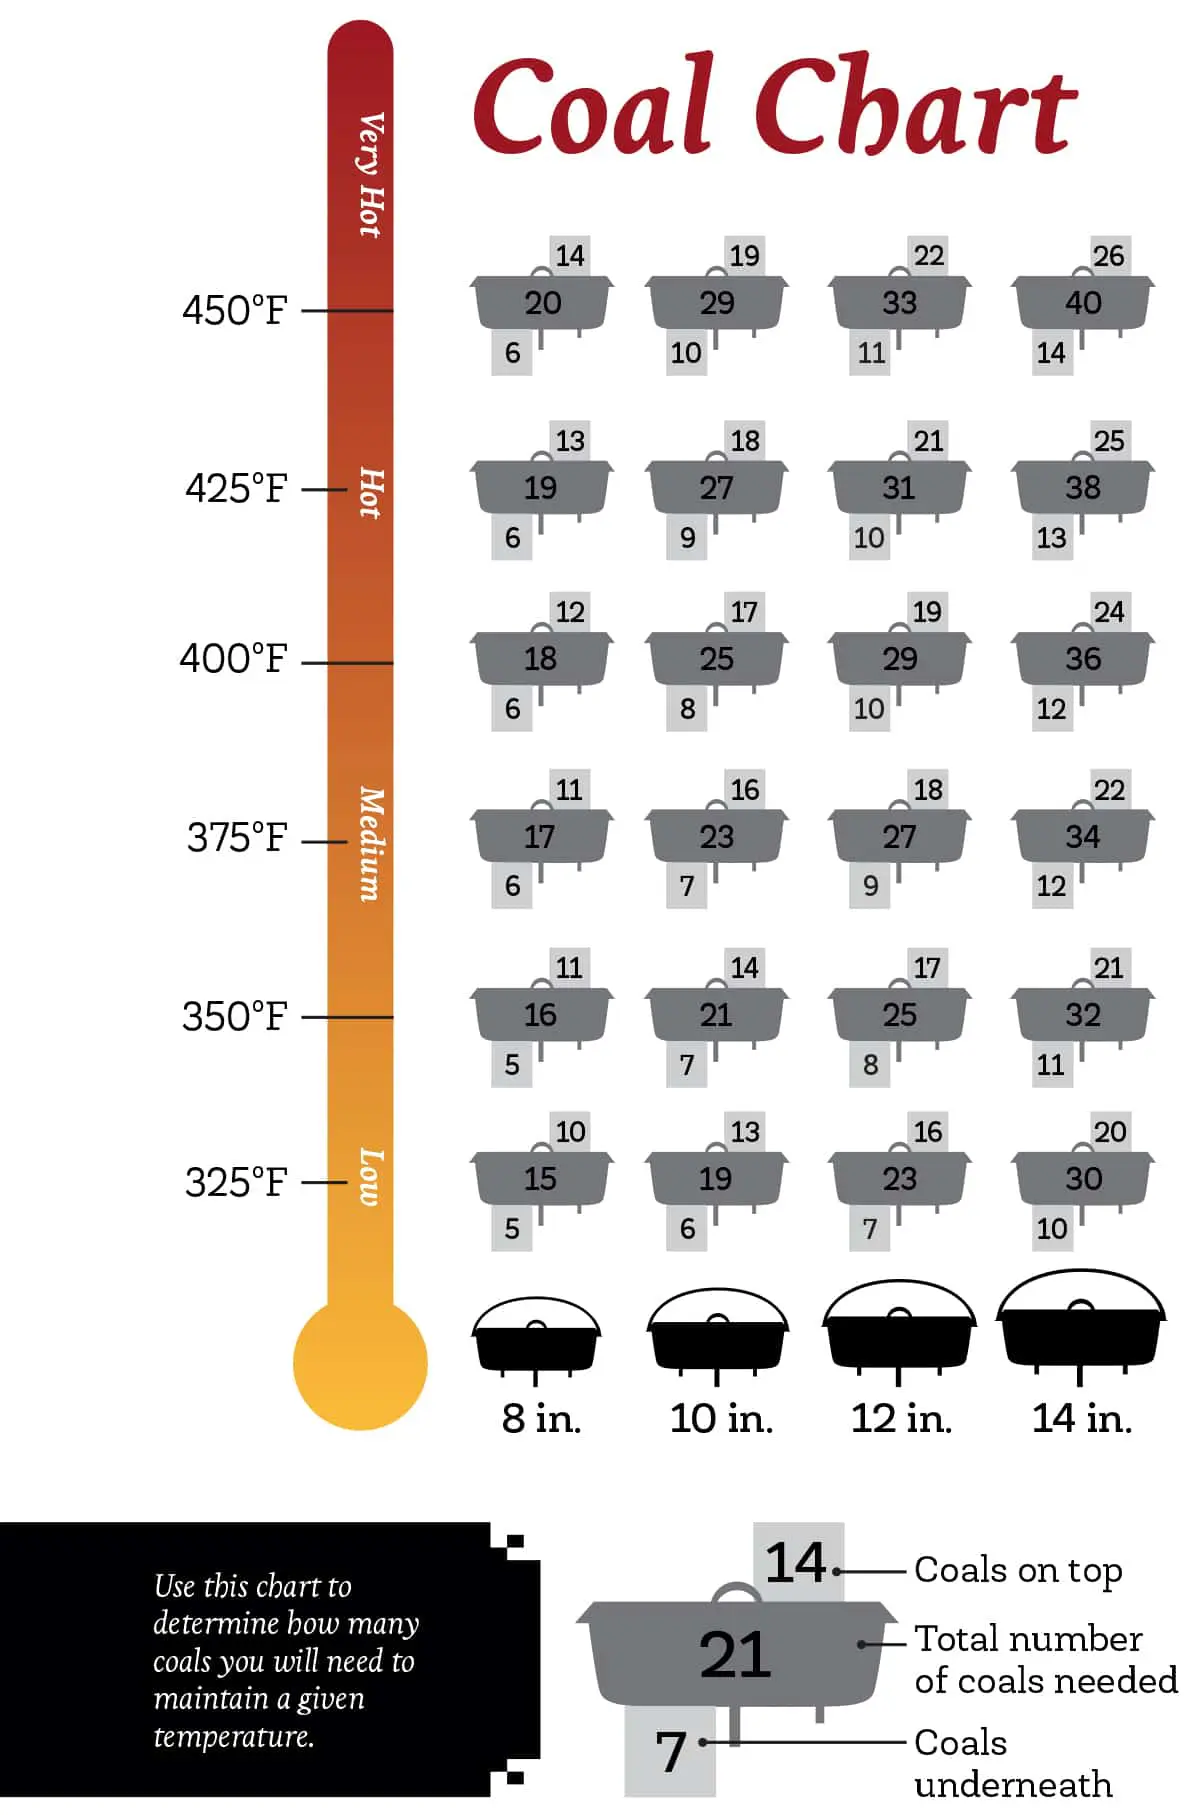
The Coals
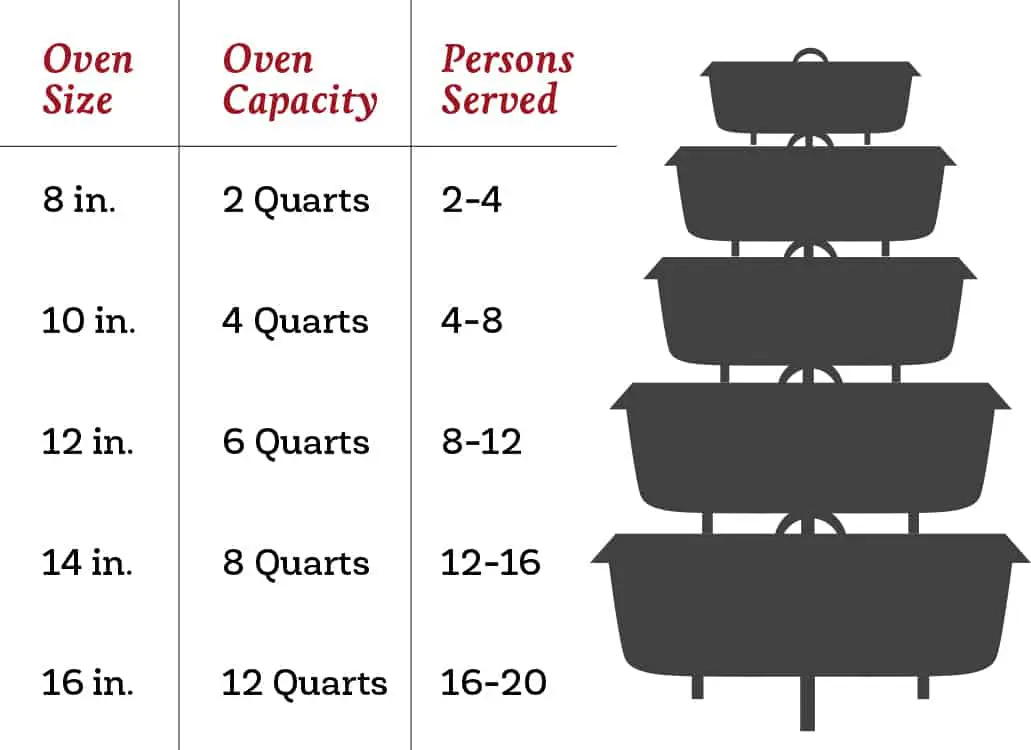
There’s a very imprecise science to generating heat for your Dutch oven. Here’s a general rule for a 375° F cast iron oven: Plan on two coals per inch of the oven’s diameter with three extra on top and three fewer underneath. For a 12-inch oven, this calculates to 27 coals—9 for the bottom, and 18 for the top. The variables include the material of the oven (aluminum ovens heat up faster than cast iron and can have hot spots), how much food is in the oven (biscuits versus a 4-inch-tall lasagna, which will take longer to cook), how big and hot the coals are, and the temperature desired. You can adjust the temperature by approximately 25° F by adding or removing two coals.
The Finishing
Fussy cast-iron aficionados will have you believe clean-up and seasoning is a complicated art form. Not true! You can use mild dish soap to clean cast iron, along with a scrub brush or plastic scraper. For stubborn, stuck-on food, simmer a little water before scrubbing. After the pan cools, the caked-on gook will come right off. Dry with a towel, or dry over low heat on the coals, and then rub a small amount of cooking oil onto the surface of your oven using a paper towel to ensure no residue remains.

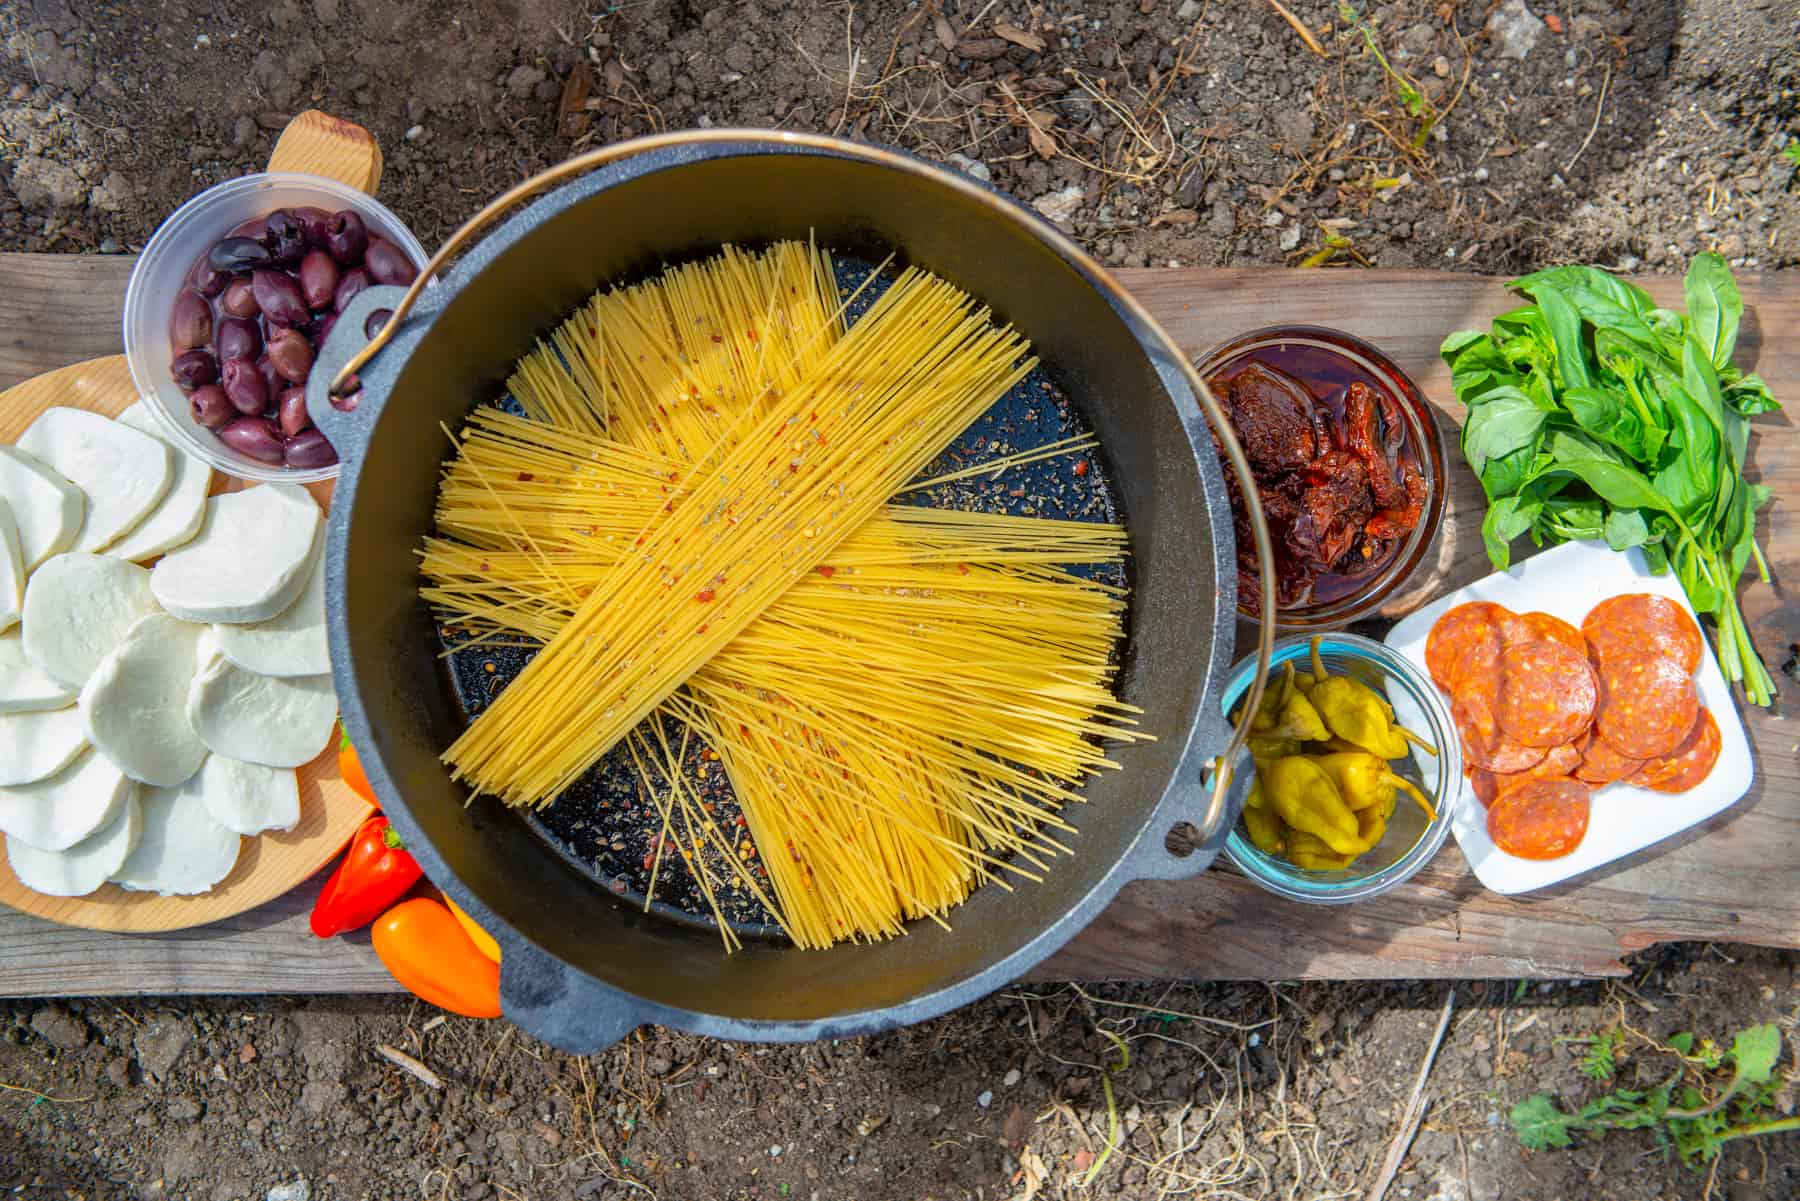
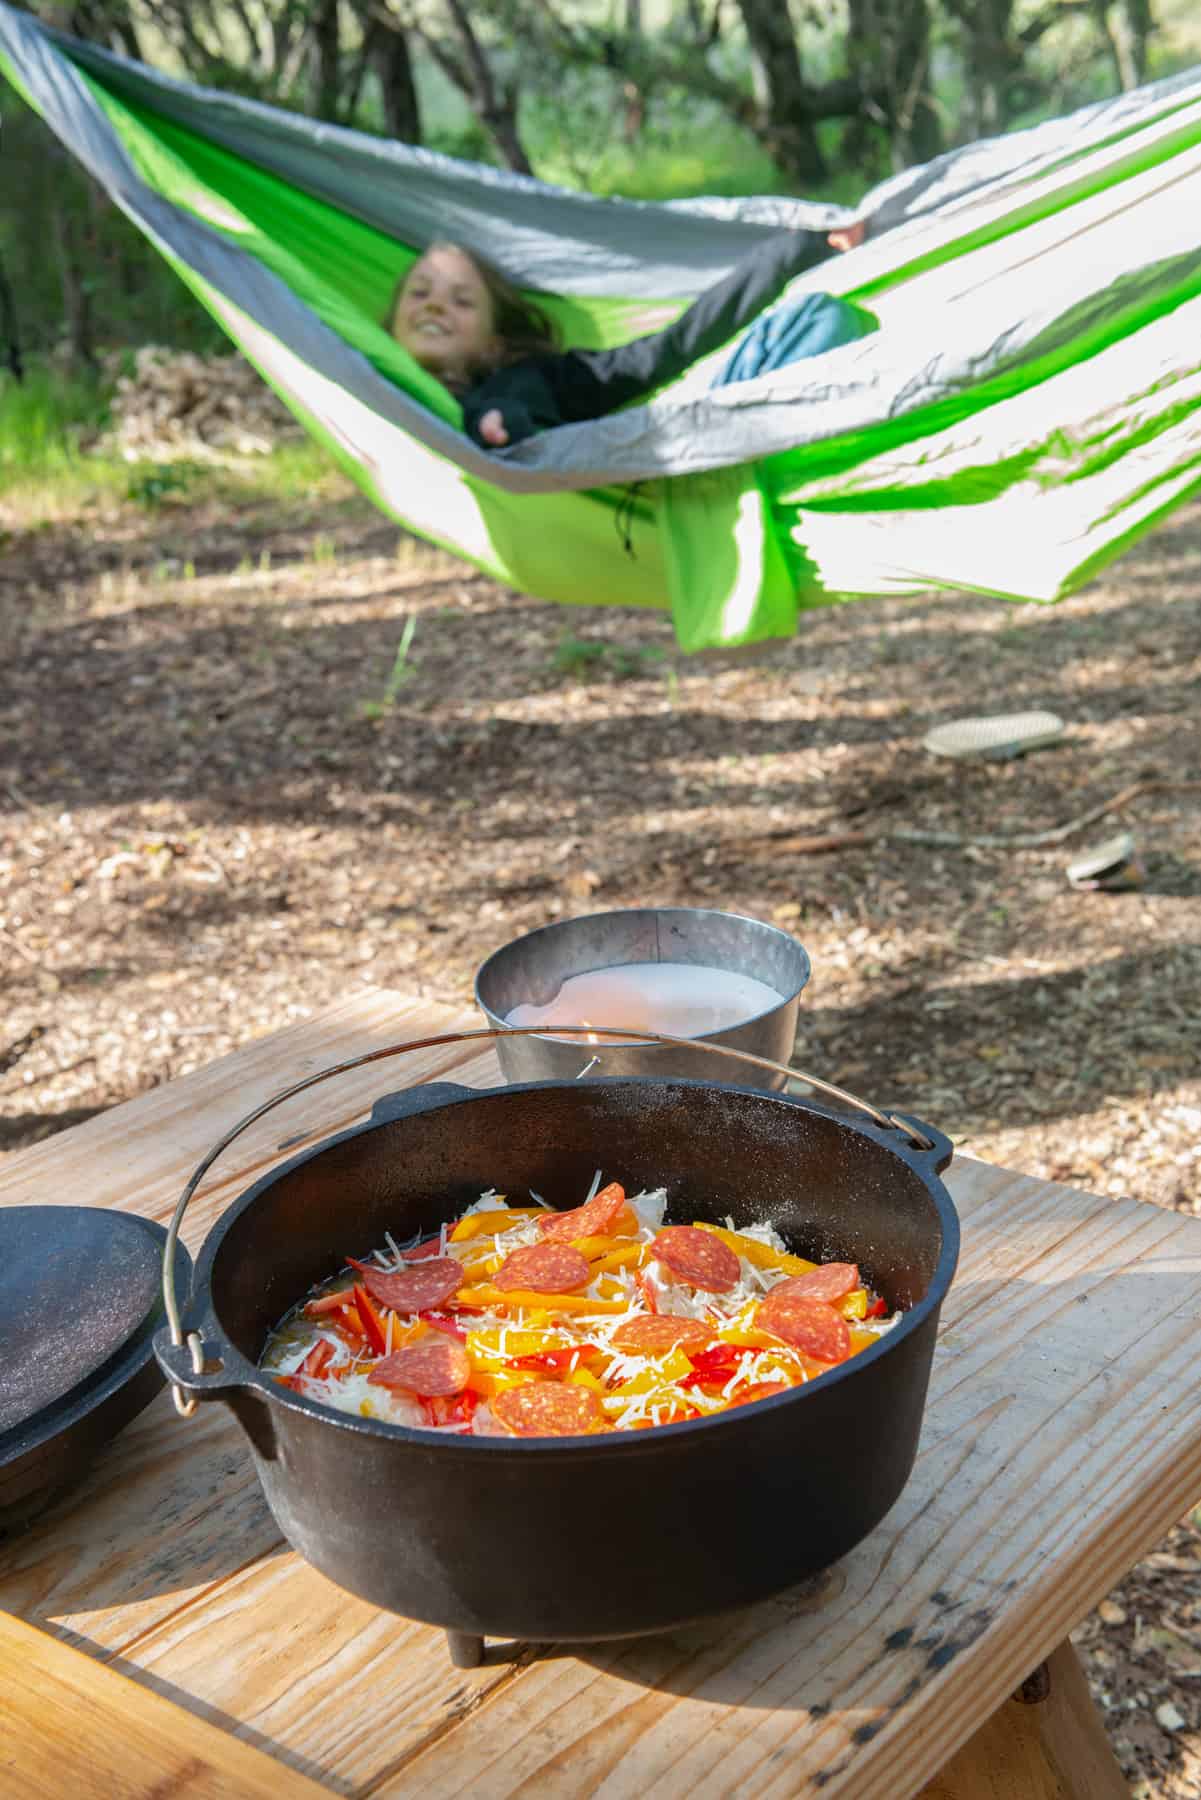
One Pot Cheesy Pasta for a Crowd
—
Serves 6 to 8
—
Think of this one-pot dish like a pizza—virtually any ingredient can be added or substituted, like mushrooms, cherry tomatoes, Italian sausage, or sliced red onions.
—
1 pound angel hair pasta
½ cup extra virgin olive oil
2 tablespoons dried Italian seasoning
1 teaspoon red pepper flakes, crushed
½ teaspoon black pepper, ground
½ cup Kalamata or another gourmet olive, pitted and halved
½ cup oil-packed sun-dried tomatoes, drained and chopped
2 tablespoons pepperoncini, pickled and chopped (optional)
Kosher salt (optional, as olives may be salty)
3 cups water
16 ounces mozzarella cheese, sliced or torn into pieces
1 cup Havarti or Gruyere cheese, grated
2 colored peppers, sliced thinly
12 pepperoni slices
½ cup parmesan cheese, grated (plus more for serving)
Fresh basil leaves, torn
- Start 25 to 30 charcoal briquettes in your fire pit.
- Grease a 12-inch Dutch oven with vegetable oil. Add dry pasta, olive oil, spices, red pepper flakes, black pepper, olives, sundried tomatoes, and pepperoncini (if using). Add up to ½ teaspoon of salt, if your olives are not too salty. Gently toss the mixture with your hands or tongs.
- Add the water and gently toss once more. Add the mozzarella and havarti cheeses in a single layer, and top with the bell peppers and pepperoni. Sprinkle with parmesan.
- Place the Dutch oven over 10 to 12 coals, and then place 15 to 18 on top.
- Bake for approximately one hour, or until the pasta has absorbed the water, the cheese has melted, and the peppers are lightly charred. Don’t worry if the edges of the pasta are crisp, or even close to burnt; the center will be full of deliciousness.
- Blot any residual oil with a paper towel (or not!) and serve.
* Recipe adapted from Half Baked Harvest by Tieghan Gerard


Very Berry Coffee Cake
—
Serves 6 to 8
—
I’m an early riser, so starting a fire, enjoying a cup of coffee, and baking a cake while watching the sunrise is a treat. When the gang gets up, they’ll have missed the solitude but will be graced with a hot coffee cake.
—
For the Cake
2 cups all-purpose flour
½ teaspoon baking soda
1 teaspoon baking powder
½ cup sugar
1 cup sour cream
2 eggs, lightly beaten
½ cup butter, melted
1 cup fresh summer berries (like huckleberries)
- Start 25 to 30 charcoal briquettes.
- Grease a 12-inch Dutch oven with vegetable oil.
- Combine all the dry ingredients (flour, baking soda, baking powder, and sugar) in a mixing bowl.
- Melt the butter in a small saucepan and cool. Add the sour cream and eggs, and mix well. Fold the butter mixture into the dry ingredients, stirring only until moistened. (Do not overmix!)
- Fold the berries into the mixture, and pour it into the Dutch oven.
For the streusel
1 ¼ cups all-purpose flour
¾ cup brown sugar
1 ½ teaspoons ground cinnamon
1 ½ teaspoons Kosher salt
¾ cup unsalted butter, cold
Whipped cream (optional)
- Using a fork, cut in the butter with brown sugar, flour, cinnamon, and salt in a small bowl. It’s okay to use your fingers to fully break down the butter until the streusel resembles wet sand.
- Sprinkle the streusel over the top of the cake.
- Place the Dutch oven over 8 to 10 coals, and place 12 to 15 on top.
- Bake for approximately 40 minutes. Serve warm with whipped cream.